Monday 15 October 2012

Referencing guidance

www.listofphotographers.blogspot.com

Within your research work, you will need to reference your sources in a bibliography. There's loads of guidance out there which is fairly confusing and contradictory and some of your lecturers are going to get hot under the collar if you get it wrong. If you've got those kind of lecturers and perhaps you're on a degree you may want to ignore this blog and search elsewhere under the heading Harvard Referencing

But if you're on a level 3 course and just starting out we'll be more than happy if you do the following...

As you identify the websites, books and journals you're going to source you research from (Including images) you need to keep a list at the end of your blog entry that lists these. This is referred to as your Bibliography...


Websites (images) Have a brief description of the image and then the HTML link and the date that it was accessed. You could group all of the different types together...

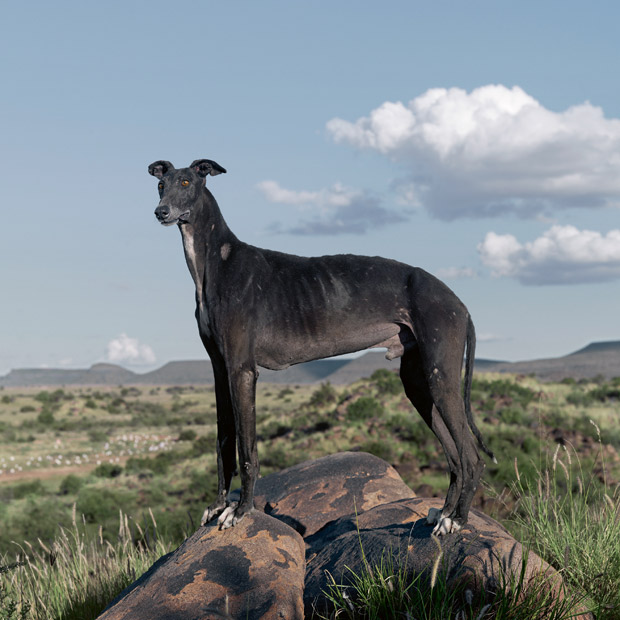
Image- Africanis Dog, Danielle Naude; http://static.guim.co.uk/sys-images/Arts/Arts_/Pictures/2013/7/31/1375271390007/Daniel-Naud--dog-photogra-008.jpg  26th Jan 2015.

Websites (Written material) Again state the Publisher and the theme, the HTML link and the date it was accessed as below in this example.


Text - The Guardian Danielle Naude article "Africanis". http://www.theguardian.com/artanddesign/2013/aug/01/daniel-naude-best-photograph-dog 26th Jan 2015

Books With this start with whether you've used the resource for text or image based reference material. Give a brief description of what was used, then follow with the Title, Author, date of the publication (On the inside page) and the place where the book was published and the publishing group. If you've copied images from the book state at the start whether you've used images or text.

Text - Article about The Bechers, (Page 402). Photography The Whole Story; Juliet Hacking & David Campany; 2012; London; Thames and Hudson.

Magazines/Journals With this start with whether you've used the resource for text or image based reference material. Give a brief description of what was used, then follow with the Title, Author, the page the image was copied from, the magazine title and issue number and date and where the magazine was published. If the magazine is published by a publishing group include that at the end.

Image -  Couple dancing, from series 'Poem' By Charlotte Tanguy (Page 26). British Journal of Photography, Issue 7824 (May 2014). London. BJP.

One of the secrets to blagging references at level 3 is to be consistent in the way that you do it, follow the same approach with every reference. Needless to say, if your lecturer suggests another way, go with their advice.

Quoting Text within your written material This is something we're always asking for and expect you to include in your work. It demonstrates that you're reading the research material and comprehending it and then using it in your written work to support your arguments and points of view. First some guidance about how to use quotes in your work...

  • The quotes should constitute no more than 10% of your written work.
  • They need to be clearly identified and obvious from the main body of text, much in the same way as this list of instructions is by use of indent.
  • Use inverted comma's to indicate the quote, use italics, separate the quote from the main paragraph.
  • Then follow it up with the reference using pretty much similar conventions as above...


In the image here we see that above (1) the text/writing is to the left and then the sentence leads us into the use of the quote. We identify that this is a quote at (2) by first indenting the text to the right slightly and with the additional use of the inverted commas. (3) The main body of the text is slightly smaller and again this is useful as it helps to show that this section is different e.g. a quote. Then finally the quote is referenced at (4). In this instance a website.

This same approach should be used in your blog or any written material. In a blog, especially if you're using Blogger you can create the indent with the use of a bullet point at the start.

Again I have to reiterate this may not be degree level referencing, but for level three this will suffice (Subject to the demands of your course specs and teachers).

Monday 8 October 2012

Portfolio's, presentation, interview and gaining a place on a Uni course

Portfolio's, presentation, interviews and gaining a place on a Uni course

http://www.listofphotographers.blogspot.co.uk/


If you intend to work within the creative industries connected with photography or apply for Uni places progressing along a photographic/art pathway, you will normally need to present your portfolio in an interview scenario. The presentation of your work as a physical object says a lot about you – how organised you are and how much you care about the way the work looks. This offers an insight into you and how you’re going to conduct yourself on their course or within their company (Work scenario). Therefore your work should be neat, organised, good quality, well presented and uniform.
 
Another aspect you need to consider is the fact that you've been at college in FE education for the last two years learning about photography and photographers. Lots of people take pictures, but a great many of them have no idea why or what for, or what purpose they might serve or who their audience is. Neither do they know the history and context of what they are doing, they simply continue making snaps having no understanding of Visual Language and how photography communicates to its audience. Having studied photography at FE level, there will be an expectation that you would have engaged with these aspects of your education.
 
One of the ways this will be apparent, is the content of your folio. Your work should contain images that have referenced the work of contemporary and historical photographers. The visual language and conventions of such work should be apparent in your work. In your interview, this type of work will prompt questions, allowing you demonstrate that you have engaged actively at level 3 and learned some of the fundamentals of photography. Normally work set at college in your assignments will steer you towards working with photography and photographers that are rich in commentary enabling you to conduct research that gives you a deep understanding of what photography is. It's through learning about contemporary and historical approaches and using these as the basis and starting points of your own work that you'll be able to shine in your interview discussing serious photography in conjunction with your portfolio.


.

Monday 1 October 2012

Starting a blog for college

Starting a blog for college                               http://www.southendasphoto.blogspot.co.uk/2014/12/index.html

Follow these steps to get your blog started.

(1). You will need a Google account and email. Go onto Google and set that up. Make sure you keep a note of your Google account details (Put them on your phone) or email them to your usual email account.

 
(2). Now when you're signed into the Google webpage near the top right-hand corner you'll see a small group of nine squares, as it says in the diagram click the squares button.
 (3). This will then open up the Google Apps. At the bottom see arrow, click on the 'More' tab.
 (4). You'll then be presented with your Google log in confirmation again. Enter your login details once again...

 
 (5). This will then take you to this 'Blogger' page below. Click 'Continue to Blogger'.
 (6). This page below - click on to the 'New Blog' button.
(7).  This next stage is the important stage. Follow these instructions carefully. "Title" indicated by arrow 'B' is where you name the blog. This can be changed at any time, but for the moment just called it something simple like your name followed by research blog e.g. Joe's Research Blog.

The address section 'A' is the bit you've got to get right. If you're starting this blog before your first day, you need to find one of the letters that the college has sent you previously with your student number on it. Use your initials for the blog title followed by the student number. This is always an 8 digit number. YOU MUST use your initials followed  your 8 digit number in the section indicated by arrow 'B'. Blogger automatically adds the .BlogSpot.co.uk and the full address appears under the part you type the address into for you to click and confirm you're happy with and then it checks to see if it's available.

If you're already in college, your student number is on your ID card, so follow the same instructions as above. Don't worry about the design of the blog at this stage, just choose simple (you can change it later).
 
 (8). Now click 'Create Blog'.
(9). Now you'll be taken to this page below and you'll need to click the little orange tab with the pen symbol in it which you use to create your first and new post. In future as you add new content to your blog you click this little tab to start a new page/entry. 
 

(10). This then takes you to the editing page below. Arrow (A) is where you type or upload your content. For the moment just try typing something basic like "Always use the British Journal of Photography for my research". Then in the section marked by the arrow (B) give the blog page/entry a title next to the word 'Post'. I've typed 'Research 001'. You need to write "Bibliography". Then click the button indicated by the arrow (C) "Publish". This will then put your blog onto the internet and you'll have published your first post.
(11). Having 'Published' your first page the page will now change to this page below. There are a number of options just below your first post... Edit, view, share and delete. In order to see what your first published post looks like click 'View'. If you wanted to add to the post and change it, you would click 'Edit'. This would allow you to add more text or add things like videos and images.
(12). You'll then be presented with how your blog looks on-line. If you ever want to go back into the control panel for Blogger you have to click on to the little orange Blogger symbol in the top left hand corner of your web page.
 
 That's it! The worlds now waiting for your content. On the course you'll be guided bit by bit as to how you should title your pages as you go through the course. But for the moment just get on with what you've been set to do and send the web-link for your blog to your course leader.