Friday 25 October 2013

Typology in photography (How to Ace your A-Level)

How to Ace you A-Level in Photography (And other courses)

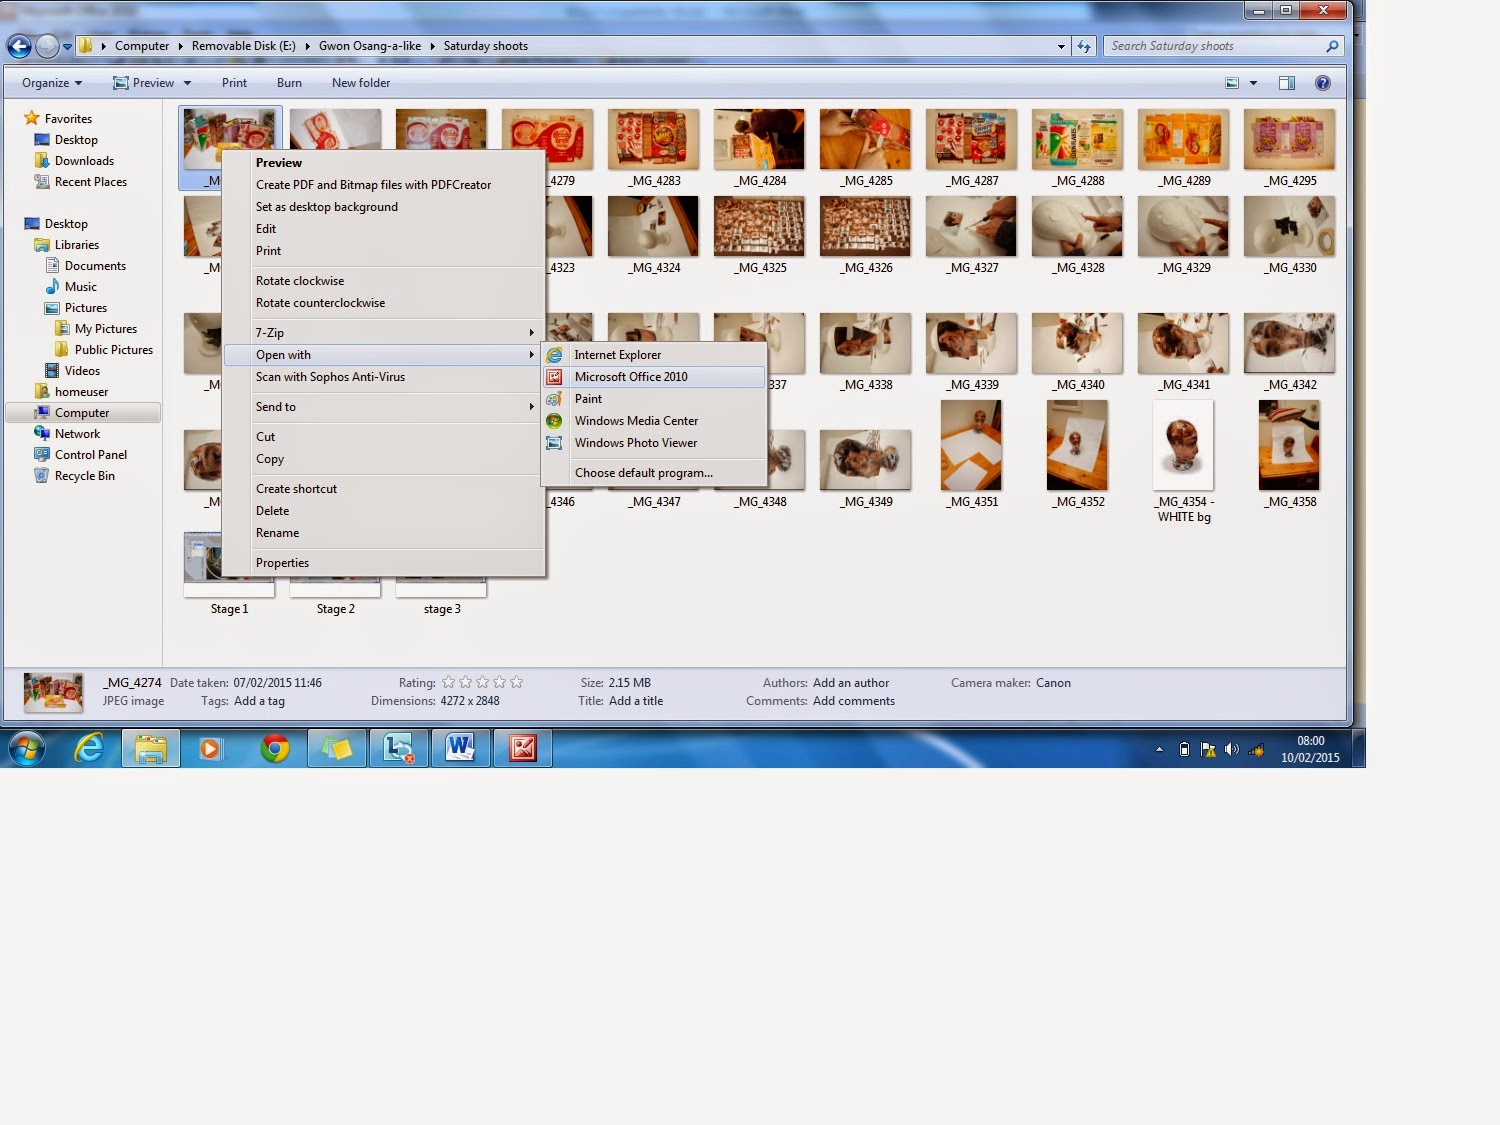
TYPOLOGY IN PHOTOGRAPHY
Across the course you need to produce images that use contemporary approaches to making and producing images. These approaches can be construed as experimental in many cases and this identifies one of the key assessment criteria that you need to meet. In addition they take your photography over and above the norm and introduce you to new concepts and ideas and broaden your photographic knowledge.

Again, I'm going to mention that your starting point should be the Journals and magazines in the LRC (Learning resources Centre) and the Forum. You should be looking at the British Journal of Photography, Hotshoe and many more on weekly basis to give you ideas and inspire you. Here's the reason why.


One of your assignments is based around the concept of presenting images as a typologies. The Daddy (And the Mummy) of typology are the Bechers - Bernd and Hiller.

As with all of the projects you need to produce the work over a series of shoots, developing and improving them as you go. At stages (After each shoot perhaps) you should review the work using a method such as the Gibbs reflective practice model to drive the work on and forwards to better results.

You should choose a subject that you like and will be happy to shoot, you need to consider all the other approaches that you've been taught about and tried and look at fusing those ideas with these. Remember the work you produce needs to be experimental in a number of ways and as you produce this work, this experimental aspect could be brought in at each of the developmental stages.

Through research, looking at Journals such as the BJP, Hotshoe etc in the LRC and The Forum you might be in a position whereby you can link the work you're doing to a theme with a deeper meaning to it rather than just a series of images that are relatively meaningless. This is one of the more difficult aspects of any project when completed to tight deadlines and you massively improved the chances of being able to work with a theme of some substance if you're researching work that is made and produced in this way,


Alinka Echevirria – Typology + catholic + catholocism + personal + objects + charms + jewellery + 
Ari Versluis – exactitudes + typology + montage + fashion + skinheads
Candida Hofer – Typology + Public Buildings – Interiors - Categorization
Chris Coekin – Hitch hikers + portraits + roads + location + daylight + types + typology
Danielle Lilley – Cadets + soldiers + typology + portraits + war + stereotype + guns + uniform
David Maisel + decay + landscape + corrosion + environmental + issues + typology + topography + water + colour + xray + horses + skulls
Donavan Wiley – Typology + Northern Ireland + conflict + war + military + deadpan + aerial
Ed Ruscha – Typology + Petrol station + Parking Lots + Streets (Hollywood Bvld) + Aerial
Frank Gohlke – New Topographic + Landscape + Typology + Deadpan + Environment + Passing of Time + Monochrome
James Mollison – typology + monkey + apes + deadpan

The Bechers Youtube link (sub titles). No.1
The Bechers Youtube link  No.2

Jasper White

The Bechers
Jeffrey Milstein
Ed Ruscha
James Mollison

http://typology.ca/typologies-within-typologies-100-abandoned-houses-and-the-heidelberg-project-today/

http://blog.redbubble.com/2012/04/photographic-typologies-the-study-of-types/

Monday 21 October 2013

35mm SLR camera The Pentax K1000

On the course you'll be introduced and encouraged to use manual SLR's, specifically the Pentax K1000 which known throughout the world as the classic teaching camera along with the Nikon FM2. 

Without regular use and access to these cameras, they can be problematic when loading and if you need guidance have a look at the link here for a quick over-view on how to load the camera. 


Within your work you'll be expected to describe in detail the features of the camera and how you use it. Click here for a link to part 1 of the manual. Part 2 can be found here. Use the information here to support your descriptions of your own use and experiences with the camera. The main things you need to describe and write about are some of the trickier aspects of loading the camera, the setting of the ISO, the metering system and the focus.

Those of your on the 60009 course need to discuss the camera in terms of how it differs from using your DSLR along with discussing any similarities that you recognise.

Deadpan aesthetics - Thomas Ruff - Subjective v Objective

http://www.listofphotographers.blogspot.co.uk/

One of the main photographers and photographic perspectives we look at on the course is Thomas Ruff and the Deadpan Aesthetic. You're advised to look into this and engage with it as it can potentially accelerate your learning and it encourages you to produce images in a way that you've probably not beforehand. With a little reading and practice you will normally start to produce images that people will look at and take notice of and it also gives you a new perspective with which you can work with. 

For a basic introduction you should look at Charlotte Cottons book The photograph as contemporary art as there is a really useful chapter within the book dedicated solely to the subject. You're advised to use this book as a rule on the course as it's wholly relevant to what we teach.

http://www.amazon.co.uk/Photograph-Contemporary-Art-World/dp/0500204012


The key photographers that we look at and use is Thomas Ruff & The Bechers


The key point with regards these images is the implementation of a system (Mechanical approach) whereby the way you shoot the images is subject to a set of rigid rules in the same way as Ruffs predecessors 'The Bechers' do with their Typologies (See below). This method Ruff came about by applying the same sort of approach, asthat  forced on you when having your photograph taken when completing a passport...

From the Govt website (Link below) 

For passport photos:
  • eyes must be open and clearly visible, with no flash reflections and no ‘red eye’
  • facial expression must be neutral (neither frowning nor smiling), with the mouth closed
  • photos must show both edges of the face clearly
  • photos must show a full front view of face and shoulders, squared to the camera 
  • the face and shoulder image must be centred in the photo; the subject must not be looking over one shoulder (portrait style), or tilting their head to one side or backwards or forwards
  • there must be no hair across the eyes
  • hats or head coverings are not permitted except when worn for religious reasons and only if the full facial features are clearly visible
  • photos with shadows on the face are unacceptable
  • photos must reflect/represent natural skin tone

Background

Photos must have a background which:
  • has no shadows
  • has uniform lighting, with no shadows or flash reflection on the face and head
  • shows a plain, uniform, light grey or cream background (5% to 10% grey is recommended)

The Bechers (Bernd & Hiller) more or less came up with this concept as a way of photographing buildings applying a very similar approach to their subjects giving rise to the birth of the deadpan aesthetic in photography and New Topography.


This approach whereby the images are taken using a set of rules is an objective approach and it pushes aside any of your own subjective considerations and makes you take images that are very different. This approach will draw comment from people as it challenges their usual visual take on how photography is done and makes your images stand out. The fact that is creates discussion about the approach means that you'll have to ask questions about your own practice 'What constitutes a portrait' where have the rules for portraiture come from, what is their purpose and what are they trying to convey with a portrait and how is it done?

http://www.listofphotographers.blogspot.co.uk/

Sunday 20 October 2013

Reducing files sizes for blogging.

Using pictures on your blog

 One of the things you simply must do is use images on your blog. Your blog must be full of your images.

 All of your projects should be made up of a number of developmental stages, test shoots, trials and evidence of trying things out, all of this work needs to be on the blog along with the associated reflective work (Gibbs).

 To make using images on blogger easier, you need to reduce the file sizes before uploading them.

 Copy the images that you’re going to upload and paste them into a designated folder used for this purpose “Small blog files”.

Once in there, reduce the files using Photoshop or similar. I tend to use Microsoft Picture Manager/Microsoft office, here's how...
 
Click on one of the images once you're in the folder and right click it. Select "Open with" and then Microsoft office.
In the top left-hand corner of this screen (Below) there are 3 square icons, click the one right at the edge of the page (Furthest left).
          You'll then be presented with this screen here (below). With the image you selected highlighted +  the rest of the images in the folder. In the menu bar to the left select 'Edit' and choose 'Select all'.
 All of the images will then be highlighted. Then choose 'Picture' from the menu bar and then select 'Edit'. You will then be presented with another drop down box on the right-hand side. Choose 'Resize' and then 'Pre-defined' and then 'Web page large' and then click 'Ok' at the bottom.


 Finally go up to the top left hand side of the menu bar and click 'Save'. The images will then be reduced to a small size ready for your upload. The only thing you might want to do then is rename them in the order that you want them to appear in your blog. I think if you rename them 001, 002 and so on they will be automatically placed in the blog in that order.
    The only other thing you might want to use this for is to make a quick contact sheet. At the first stage when you open the images in Microsoft office, you'll see in the menu bar 85%, you can type in the size you want and it'll change the view enabling you to see your images larger and smaller as a collective. Once it looks nice and tidy you can print screen and paste into Microsoft paint. Once in there click paste and then crop the edges of the picture away to make an easy to do contact sheet. Don't forget to save as a JPEG and it'll do so at a small usable size.
 

Section 21 - Your first shoot (Getting Started).

It is absolutely essential that you get your first set of images shot within a matter of days in some instances and certainly in the first week with the longer projects! Again we have to reiterate this becomes so much more manageable if you've been doing on-going research in your own time independently.

All art work is the product of a process of development of skills, techniques and the idea. Your project needs to show the development of these aspects over the period of the brief and this done by producing at least three shoots where the work improves and becomes more coherent as an idea and as a set of images. 

It therefore follows that your first shoot can be virtually anything as long as it is linked to your work. So in the example I've been using any images of shoes would do, as long as you're exploring some aspect of what you're going to do. The first shoot might just be exploring what angle you want to shoot the shoes from - a side view, the under-side, the top-side, whether you're going to have a single shoe or the pair. At the same time you could test the light that you might use and a range of lenses to see what works best. All of this is a part of the development process.

At this stage, digital works well just to get pictures in your books/folders and demonstrates that you've made a start and enables your lecturers to give you feedback and discuss what you're doing. More importantly though, it's through this process of doing 'Test shoots' that you'll get some sense of the challenges that you may face in getting the project to the next stage.

Once you've shot the images, these need to be put in your book. Ideally you would produce a contact sheet with all the images on and handful of images 4 or 6 perhaps - approx 5" x 7" in size. You will then have to annotate the images with observations you've made about the process so far.

At this point you will need to do your first reflective written piece using the Gibbs Reflective Practice model.